
Walk into any squash court and you’ll notice it straight away. When the lighting feels right, the game flows. The ball is easy to track, the walls feel evenly lit, and players move with confidence. When it’s wrong, everything feels harder than it should be. Squash is fast, visual, and unforgiving, so lighting quietly shapes the whole playing experience. From local clubs to televised glass courts, well-thought-out lighting makes a real difference to performance, comfort, and even how long players want to stay on court.
Below is a deep dive into how squash court lighting works in practice, covering standards, design ideas, layouts, technology choices, costs, and common mistakes, all explained in a more down-to-earth way.
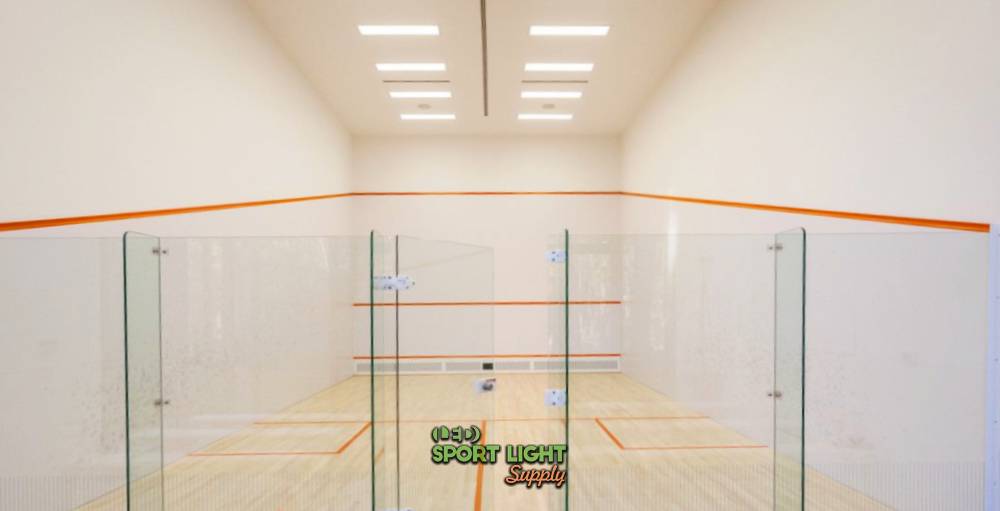
At first glance, a squash court feels like a clean, simple box. Step inside and start playing, though, and you quickly realise how visually demanding it really is. The squash ball is small, dark, and moves incredibly fast. In professional matches, speeds can easily go beyond 200 km/h, and even during everyday club games, the ball often travels fast enough that players have only fractions of a second to react. In that kind of environment, lighting quality directly affects how well players can read the game.
Squash relies heavily on peripheral vision. Players aren’t always looking straight at the ball; they’re tracking movement while preparing their next shot. When lighting is uneven, with darker patches or sudden bright spots, the eyes are forced to constantly adjust. Over the course of a 40–60 minute match, that leads to eye fatigue, slower reactions, and more unforced errors. This is why squash court lighting is about far more than just making the space “bright enough”.
Most squash courts use white or off-white walls with reflectance values that can exceed 70–80%. On paper, that sounds like a good thing, because reflective surfaces help distribute light more evenly. In practice, it’s a double-edged sword. High reflectance improves overall brightness, but it also amplifies glare if luminaires are poorly positioned or have wide, uncontrolled beam angles.
The visual contrast between the ball, the walls, and the floor is another factor. A black or dark blue ball against a bright wall needs consistent lighting to remain visible, especially during high-speed rallies close to the front wall. When light levels drop unevenly near corners or along side walls, the ball can briefly “disappear”, which disrupts timing and confidence. Well-designed squash lighting takes wall luminance into account, not just floor lux readings.
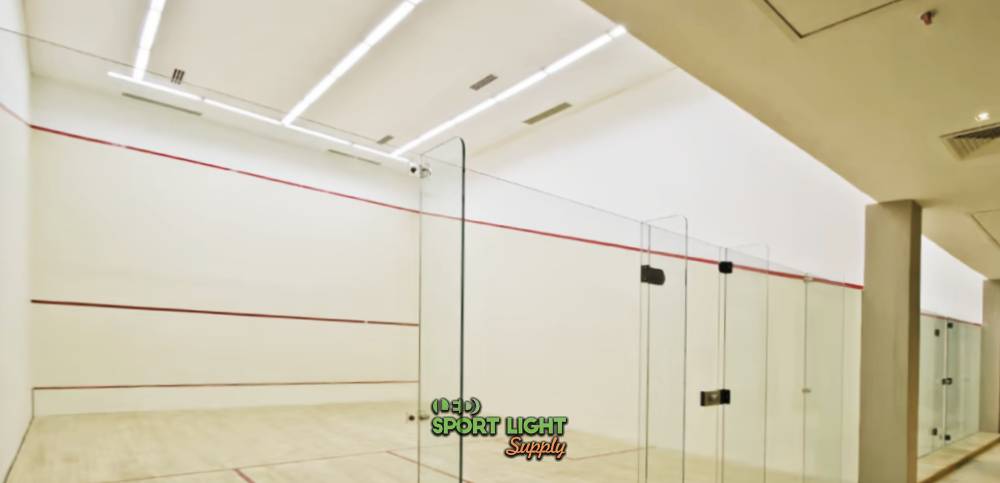
Glass-back courts bring a different set of visual challenges. While they look impressive and are great for spectators, the glass surface reflects light far more directly than plastered walls. If fixtures are mounted at the wrong angle or height, reflections from the rear wall can bounce straight into players’ eyes, particularly during serves and defensive lobs.
On show courts, lighting designers often need to balance horizontal illuminance on the floor with vertical illuminance on the walls, sometimes aiming for vertical levels of 500 lux or more to keep the ball visible at all heights. At the same time, glare control becomes even more sensitive, as players are constantly turning and changing direction. This is why lighting solutions designed for standard indoor sports halls often fall short when used in glass-back squash courts.
Ceiling height plays a surprisingly large role in how squash court lighting performs. Many older courts were built with ceilings around 5.5 to 6 metres, which limits how light can be distributed. With lower mounting heights, fixtures need wider beam spreads, increasing the risk of glare and uneven brightness if not carefully designed.
Newer facilities often feature higher ceilings, sometimes 7 metres or more, giving designers more freedom to use tighter optics and better glare control. Higher mounting positions also help achieve smoother uniformity across the playing area, which is especially helpful for fast rallies and high shots off the back wall. However, even with generous ceiling height, the enclosed nature of a squash court means there’s very little margin for error.
All these factors combined make it clear that squash courts can’t rely on generic indoor lighting approaches. The speed of play, reflective surfaces, enclosed geometry, and vertical ball movement create a visual environment that is unique among indoor sports. Lighting has to support quick reactions, reduce visual fatigue, and stay consistent from the first serve to match point.
That’s why squash court lighting works best when it’s designed specifically for the sport, using sports-rated luminaires, controlled optics, and layouts that respect how players actually move and see on court. When lighting fits the environment properly, players stop thinking about it altogether, and that’s usually the best sign it’s doing its job.
Lighting standards are not there to make life complicated for designers or facility owners. They exist to create a shared baseline, so a squash court feels playable and familiar no matter where you are. When lighting follows recognised guidelines, players can step onto a court and trust that they’ll be able to see the ball clearly, judge depth properly, and play without constantly fighting shadows or glare. Consistency across venues is a big part of this, especially for leagues, tournaments, and training programmes.
Without clear standards, lighting decisions often become subjective. One venue may feel overly bright but patchy, while another looks dim despite using powerful fixtures. Standards help avoid those extremes and give everyone a common reference point.
| Court Type | Horizontal Illuminance (Lux) | Vertical Illuminance | Uniformity Ratio | CRI | Color Temperature |
|---|---|---|---|---|---|
| Recreational / Training | 300–400 | Basic wall lighting | ≥ 0.7 | ≥ 80 | 4000K–5000K |
| Club Competition | ~500 | Moderate wall lighting | ≥ 0.7 | ≥ 80 | 4000K–5000K |
| Professional / Tournament | 750–1000 | Close to horizontal level | ≥ 0.7 | ≥ 80 | 4000K–5000K |
| Broadcast / Show Court | 1200+ | High vertical illumination | ≥ 0.7 | ≥ 80 | 4000K–5000K |
Most squash courts are designed around guidance from organisations such as the World Squash Federation, the European standard EN 12193, or recommendations published by the Illuminating Engineering Society. While the documents differ slightly in structure and terminology, the core ideas are very similar. They focus on adequate light levels, good uniformity, controlled glare, and lighting that supports fast ball movement.
For everyday recreational courts, lighting levels typically fall in the range of 300 to 400 lux, measured on the playing surface. This level supports casual play and coaching without excessive energy use. Club-level competition courts usually aim a bit higher, around 500 lux, which helps with faster rallies and longer matches where visual comfort matters more.
Professional and tournament courts raise the bar further. These courts often target 750 to 1,000 lux, creating a brighter and more consistent environment that suits high-speed play and elite performance. Once television cameras come into play, lighting levels can climb beyond 1,200 lux, especially when extra light is added to the walls to support vertical ball tracking and broadcast image quality.
One detail that often gets overlooked is the difference between horizontal and vertical illumination. Horizontal lux values tell us how bright the floor is, but squash is played in three dimensions. The ball frequently travels well above head height, particularly during defensive shots and lobs. Because of that, standards increasingly refer to vertical illumination on the front and side walls, not just floor measurements.
In higher-level courts, designers may aim for vertical lighting values that are close to the horizontal levels, ensuring the ball remains visible at all heights. This approach reduces moments where the ball blends into darker areas of the wall, which can throw off timing and shot selection.
Brightness alone doesn’t guarantee good lighting. Uniformity plays an equally big role in how a court feels to play on. Many standards specify a minimum uniformity ratio of 0.7, meaning the darkest area of the court should still receive at least 70% of the average light level. When uniformity drops below that, players start noticing dark corners, uneven wall brightness, or distracting patches of light.
Good uniformity reduces the constant adjustment your eyes have to make as you move around the court. Over a long session, that translates into less eye strain and more consistent performance, especially during fast rallies close to the walls.
Colour rendering is another part of lighting standards that has a real impact on play. A CRI above 80 is commonly recommended so the ball, court lines, and wall markings look natural rather than flat or greyish. Poor colour rendering can make it harder to judge speed and distance, even if the court looks bright on paper.
Colour temperature also matters. Most squash courts settle comfortably in the 4,000K to 5,000K range. This produces a clean, neutral white light that feels fresh without being cold or clinical. Warmer tones tend to reduce contrast, while overly cool lighting can feel harsh over long matches. Staying within this range keeps the environment balanced and familiar for players.
It’s worth remembering that lighting standards are meant to guide, not restrict. They provide a reliable framework, but real-world courts still need thoughtful design to deal with ceiling height, wall finishes, glass backs, and usage patterns. When standards are applied with a good understanding of how squash is actually played, the result is lighting that feels natural, supportive, and easy on the eyes.
Lux figures are usually the first thing people look at when discussing squash court lighting. They’re easy to compare and simple to understand. That said, anyone who has played on two courts with the same lux level knows they can feel completely different. How light behaves across the space matters just as much as how bright it is. What players experience on court comes from a mix of brightness, balance, and visual comfort working together.
Lighting that looks good on paper can still feel awkward during play if other performance metrics are ignored. That’s why designers pay attention to several key factors beyond raw lux numbers.
Illuminance refers to the amount of light reaching the court surface, usually measured in lux at floor level. This is where most standards start, and for good reason. Adequate illuminance helps players read the bounce of the ball, judge distances, and move with confidence.
However, squash courts aren’t static environments. Players are constantly changing direction, moving into corners, and playing shots close to the walls. If illuminance drops noticeably in certain zones, the court can feel uneven. Even a difference of 100 to 150 lux between areas is enough for players to notice during fast rallies. Consistent floor lighting lays the foundation, but it’s only one piece of the puzzle.
Uniformity describes how evenly light is distributed across the court. When uniformity is poor, the eye is forced to adapt as players move between brighter and darker areas. This can make the ball harder to track, especially when it’s moving quickly along the side walls or into the back corners.
In squash, where rallies can last several minutes, poor uniformity tends to show up as eye fatigue rather than an obvious lighting fault. Players may feel slower or less sharp without immediately realising why. A well-lit court with a uniformity ratio around 0.7 or higher creates a smoother visual flow, allowing players to focus on the game instead of subconsciously adjusting to the lighting.
Glare is one of the most common complaints in squash courts, and it’s also one of the easiest to underestimate during design. Direct glare occurs when a bright luminaire sits within a player’s line of sight, often during serves, high lobs, or shots played off the back wall. Reflected glare can be just as distracting, bouncing off glossy walls or glass back panels.
Modern sports luminaires use optical shielding and precise beam control to reduce glare, but fixture placement is still crucial. Even a high-quality fitting can cause discomfort if it’s mounted too low or aimed poorly. Good glare control keeps light where it’s needed, without drawing attention to the source itself.
Unlike many indoor sports, squash is played vertically as much as it is horizontally. The ball regularly travels above head height, especially in defensive play and during high, looping shots. If the walls aren’t lit properly, the ball can briefly blend into darker backgrounds, making it harder to judge speed and trajectory.
That’s where vertical illumination comes in. By ensuring adequate light levels on the front and side walls, designers help keep the ball visible throughout its full path. In higher-level courts, vertical illuminance values often reach 60–80% of the horizontal floor levels, which significantly improves visual clarity during fast exchanges.
Flicker used to be a bigger issue in squash courts, particularly with older metal halide systems that took time to stabilise and could fluctuate during operation. While flicker is not always obvious to the naked eye, it can still affect comfort and concentration over long periods.
Modern LED systems, when paired with quality drivers, operate at very high frequencies, making flicker virtually imperceptible. This benefits not only players but also cameras used for coaching, live streaming, or broadcast. Even in slow-motion playback, a stable lighting system helps maintain a clean, professional visual appearance.
Each of these performance metrics plays a role on its own, but their real value comes from how they work together. A squash court with the right balance of illuminance, uniformity, glare control, vertical lighting, and flicker stability simply feels easier to play on. Players react faster, feel less tired, and trust what they’re seeing.
When lighting metrics are carefully considered as a whole, the result is a court where the lighting disappears into the background, letting the speed and rhythm of the game take centre stage.
 Good squash court lighting almost always starts with one simple mindset: think like a player, not a technician. When someone stands at the T, their eyes are constantly shifting between the front wall, side walls, and the ball moving at speed. They’re not staring at the ceiling, but they’ll notice straight away if a bright light appears in their line of sight during a serve or a high lob. Respecting natural sightlines is one of the foundations of effective squash lighting design.
Designers spend a lot of time considering where players look most often and how the ball travels during rallies. The aim is to create a court that feels evenly lit from every angle, without drawing attention to the light sources themselves. When lighting is done well, players rarely talk about it. When it’s done poorly, it becomes the first thing they complain about.
In most squash courts, luminaires are placed outside the main playing zone. This usually means ceiling-mounted fixtures that are either recessed or installed at a height where they stay out of direct view. Mounting heights commonly range from 5 to 7 metres, depending on the building structure. At these heights, light can be spread across the court without creating harsh glare.
The positioning isn’t just about height, though. Lateral placement matters just as much. Fixtures are often aligned along the length of the court rather than directly above the centre, helping to keep bright points away from common viewing angles. For players, this reduces moments where the eye is pulled toward a light source instead of the ball.
Beam angle selection plays a big role in how a squash court feels. Wider beams are useful for lower ceilings, where light needs to spread quickly to cover the full court. Narrower beams work better in higher spaces, allowing designers to control where light lands and avoid unnecessary spill.
A well-designed system spreads light across both the floor and the walls. If too much light is focused on the floor, the court can feel bright but visually flat. If the walls are underlit, ball tracking suffers, especially during high defensive shots. Balanced light distribution helps maintain contrast and clarity throughout the rally, from floor to ceiling.
Glass-back courts require extra attention during the design phase. Glass reflects light much more directly than painted walls, so poorly aimed fixtures can create distracting reflections for both players and spectators. Even small changes in aiming angle can make a noticeable difference.
Designers often use luminaires with tighter optical control in these spaces, carefully adjusting angles to keep reflections away from key sightlines. In some cases, separate lighting zones are used to manage the front playing area and the rear glass wall independently. The goal is to keep the court visually comfortable while still delivering the higher light levels often expected in show courts.
Ceiling height influences nearly every lighting decision. In courts with lower ceilings, usually around 5.5 to 6 metres, wider beam distributions help avoid bright hotspots directly under fixtures. The trade-off is that glare control becomes more challenging, which is why careful placement and shielding are so important.
Higher ceilings offer more flexibility. With mounting heights above 7 metres, designers can use tighter optics and more precise aiming, achieving smoother uniformity with fewer fixtures. This often leads to cleaner-looking ceilings and simpler maintenance over time.
A common mistake in squash court lighting is assuming that more fixtures automatically mean better lighting. In reality, a well-balanced design often uses fewer, higher-output luminaires rather than many low-powered units scattered across the ceiling. This approach simplifies the layout, reduces visual clutter, and makes it easier to control glare and uniformity.
When lighting design is approached thoughtfully, every fixture has a clear purpose. The result is a court that feels open, comfortable, and easy to play on, no matter how fast the rally gets.
Lighting layout is the stage where design concepts are tested against the physical reality of a squash court. Ceiling height, structural beams, access panels, and even ventilation systems all influence where fixtures can actually go. A layout that looks perfect on a drawing still needs to work safely, efficiently, and comfortably once it’s built. Good layout planning is about adapting the design without compromising playability.
For most standard squash courts, designers lean toward a symmetrical ceiling-mounted layout. Fixtures are usually aligned along the length of the court rather than across its width. This orientation supports the direction the ball travels most often and helps spread light evenly across both the floor and the walls. When done properly, this setup keeps shadows soft and predictable, which is exactly what players want during fast rallies.
In typical installations, luminaires are mounted at heights between 5 and 7 metres, depending on the structure and ceiling clearance. At these heights, light can be distributed smoothly without creating overly bright spots directly beneath the fixtures. The spacing between luminaires is carefully calculated to maintain consistent lux levels, often keeping variation within ±10–15% across the playing area.
Ceiling-mounted layouts also have the advantage of staying out of players’ sightlines. With fixtures positioned above and slightly outside the main playing zone, direct glare is reduced, and players can focus on the ball rather than bright light sources overhead.
Not every facility has the luxury of a clear, accessible ceiling. In renovation or retrofit projects, structural limitations sometimes make ceiling mounting difficult or costly. In these cases, perimeter lighting becomes a practical alternative. Fixtures are installed along the edges of the court, usually near the junction of the wall and ceiling, and aimed inward.
When executed carefully, perimeter lighting can deliver good results. The key lies in precise aiming and beam control. If fixtures are angled too steeply, glare becomes an issue, especially during serves and high defensive shots. Using luminaires with well-controlled optics helps keep light on the playing surfaces while minimising spill into players’ eyes.
Glass-back courts often require more layered lighting layouts. In addition to the main playing area, designers may create dedicated lighting zones for the rear wall and spectator areas. This approach ensures players remain clearly lit without turning the glass into a mirror.
Higher-profile courts sometimes use separate circuits or control zones, allowing operators to adjust light levels for training, competition, or broadcast. For example, the back wall might receive extra vertical illumination during televised matches, while spectator lighting is softened to reduce distractions on court.
New-build projects offer the most freedom when it comes to lighting layout. Fixtures can be integrated seamlessly into the architectural design, with mounting points, cable routes, and control systems planned from the start. This often results in cleaner ceilings and more efficient layouts with fewer compromises.
Retrofit projects tend to work within existing constraints. Reusing mounting points and electrical infrastructure helps control costs, but it also places more emphasis on choosing the right luminaires. Fixture performance, beam control, and flexibility become especially valuable, as they allow designers to achieve good lighting even when the layout options are limited.
Whether it’s a brand-new court or an older facility getting an upgrade, lighting layout decisions have long-term consequences. A thoughtful layout makes maintenance easier, reduces complaints, and supports consistent play year after year. When fixture placement is planned with both the building and the game in mind, the court feels natural to play on, no matter how intense the rally becomes.
These days, LED lighting is pretty much the default choice for squash courts, and it didn’t get there by accident. Compared with older metal halide or fluorescent systems, LEDs are simply easier to live with. They switch on instantly, don’t need warm-up time, and keep their output stable throughout a session. That alone makes a big difference for clubs running tight schedules.
In terms of lifespan, modern LED sports luminaires usually sit in the 50,000 to 100,000 hour range. For a court used 8 to 10 hours a day, that often translates to 10–15 years of service before light output drops noticeably. By comparison, metal halide lamps may need replacing every 6,000 to 12,000 hours, which adds up quickly in both cost and downtime.
Energy efficiency is another reason LEDs have taken over. A traditional metal halide system can easily draw 2 to 3 kilowatts per court, depending on the setup. A well-designed LED system delivering the same or better lighting quality often reduces that figure by 40–60%. Over the course of a year, especially in facilities with multiple courts, that reduction has a noticeable impact on electricity bills.
LEDs also respond well to dimming. Light levels can be reduced for casual play, junior training, or cleaning, then brought back up for matches or competitions. Even dropping output by 20–30% during off-peak hours can lead to meaningful savings without affecting the playing experience.
Modern LED systems pair naturally with smart controls. Scheduling allows courts to light up only when booked, while zoning lets operators adjust individual courts rather than lighting the whole facility at once. Some systems also offer remote monitoring, making it easier to spot faults or track usage patterns.
For clubs managing several courts, these features help keep operating costs predictable and extend fixture life. Less unnecessary runtime means less wear, which benefits both maintenance budgets and long-term planning.
Glass-back and show courts operate on a different level compared to standard club courts. These spaces are often used for competitions, exhibitions, and live broadcasts, so lighting has to perform for players, spectators, and cameras at the same time. What feels “bright enough” in a normal court may not cut it here.
Higher overall light levels are common, particularly on the walls. Vertical illumination on the front and side walls is often pushed well beyond standard training levels, sometimes reaching 800 to 1,000 lux or more, to keep the ball clearly visible at all heights. This becomes even more noticeable during fast exchanges close to the front wall.
Under broadcast conditions, small differences in colour become much more obvious. That’s why show courts often specify LEDs with tighter colour tolerances, ensuring consistent output across all fixtures. When colour temperatures drift or vary, cameras pick it up immediately, even if players don’t consciously notice it.
Flicker performance also matters more in these environments. High-quality LED drivers help maintain stable light output, which is especially useful for slow-motion replays and high-frame-rate cameras. Stable lighting equals cleaner footage, which benefits broadcasters and event organisers alike.
Glare control is one of the toughest challenges in glass-back courts. Glass reflects light far more directly than painted walls, so poorly aimed fixtures can quickly turn the back wall into a mirror. This affects both players on court and spectators seated behind the glass.
To manage this, designers rely on precise optics, careful aiming, and sometimes separate lighting zones for the playing area and the rear wall. Slight adjustments in mounting angle or beam spread can make a big difference. When done properly, the court feels bright and open, without players being distracted by reflections during key moments.
For televised matches, lighting design rarely happens in isolation. Designers often work closely with broadcast teams to align lighting angles with camera positions and shutter settings. This coordination helps avoid flicker, glare, and uneven exposure on screen.
The end result is a court that looks sharp and vibrant on camera while still feeling comfortable to play on. When lighting technology and design come together at this level, the court doesn’t just support the game, it showcases it.
Squash court lighting doesn’t come with a one-size-fits-all price tag. Costs can swing quite a bit depending on how the court is used, the lighting level you’re aiming for, and whether you’re starting from scratch or upgrading an existing setup. A casual community court, a busy club court, and a glass-back show court all have very different requirements, and the budget usually reflects that.
Another factor is expectations. Some facilities just want reliable lighting that meets basic standards, while others are looking for a more polished look that supports competitions, coaching, or even live streaming. The clearer the performance goal, the easier it is to align the budget with the outcome.
For a straightforward LED retrofit on a recreational squash court, equipment costs often start around USD 2,000 to 3,500 per court. This usually covers sports-rated LED luminaires designed for indoor courts, but it doesn’t include major electrical modifications or structural work. These setups are common in schools, community centres, and smaller clubs where usage is steady but not extreme.
Club competition courts generally require higher light levels, better uniformity, and stronger glare control. As a result, fixture quality and output tend to increase. Budgets for these courts typically fall in the USD 5,000 to 8,000 range per court, depending on ceiling height, fixture count, and control options.
Show courts and glass-back courts sit at the top end of the scale. Broadcast-grade lighting often involves higher output fixtures, tighter colour consistency, advanced optics, and more complex control systems. In these cases, total lighting costs can exceed USD 12,000 per court, especially when vertical illumination and dedicated lighting zones are included.
Installation costs can be just as influential as the fixtures themselves. Ceiling height plays a big role here. Courts with mounting heights above 6 or 7 metres may require specialist access equipment or longer installation times, which increases labour costs. Restricted access, older buildings, or the need to work around existing services can add further complexity.
Local labour rates also vary widely from region to region, so two identical lighting systems can end up with very different total costs once installation is factored in. Retrofit projects often try to reuse existing mounting points and wiring to keep these costs under control, which makes fixture flexibility and compatibility especially valuable.
Where LED lighting really starts to show its value is in day-to-day operation. Compared with older metal halide systems, LEDs typically reduce energy consumption by 40 to 60% per court. For facilities running multiple courts for 10 to 12 hours a day, that reduction quickly adds up.
Maintenance costs also drop significantly. LEDs don’t require regular lamp changes, and their output remains stable for many years. This means fewer call-outs, less downtime, and lower ongoing expenses. For busy clubs, avoiding even a few maintenance closures each year can make a noticeable difference to revenue and member satisfaction.
When energy savings and reduced maintenance are taken into account, many squash facilities see payback periods of around 2 to 4 years after switching to LED lighting. In regions with higher electricity prices or heavy court usage, that payback can be even faster.
Looking only at the upfront cost can be misleading. A slightly higher initial investment often delivers better uniformity, lower glare, and longer lifespan, all of which improve the playing experience. Happier players stay longer, play more often, and are more likely to recommend the facility, which adds indirect value over time.
Lighting is one of those investments that quietly shapes how a squash court is perceived. Courts that feel comfortable and visually clear tend to get used more, while poorly lit courts are often avoided, even if players can’t quite explain why.
By weighing equipment cost, installation, operating expenses, and user experience together, facility owners can make smarter decisions that pay off year after year. In the long run, well-planned squash court lighting isn’t just a cost on a spreadsheet, it’s part of what keeps a court active, attractive, and enjoyable to play on.
One of the most common misunderstandings in squash court lighting is the idea that adding more light will automatically improve visibility. In reality, over-lighting often creates new problems instead of solving old ones. Extremely high lux levels can increase glare, wash out contrast on the walls, and make the court feel visually uncomfortable over long sessions. Players may find themselves squinting during serves or struggling with depth perception, especially when bright fixtures sit close to common sightlines.
Good lighting is about balance. A well-designed court with moderate, evenly distributed light often feels far more playable than a court that is technically brighter but visually harsh.
Another frequent mistake is focusing almost entirely on floor lighting while neglecting the walls. Squash is a vertical game. The ball regularly travels above head height, particularly during defensive lobs and deep rallies. When wall illumination is uneven or too low, the ball can blend into darker areas, even if the floor appears bright.
Courts with poor vertical lighting tend to feel inconsistent. Players may track the ball comfortably in one rally, then lose it briefly in the next. Balanced lighting on both the floor and walls helps maintain clarity throughout the full trajectory of the ball.
It’s surprisingly common to see squash courts lit with fixtures originally designed for offices, warehouses, or general indoor spaces. While these lights might be efficient or inexpensive, they usually lack the optical control needed for fast-moving sports. Wide, uncontrolled beams and minimal glare shielding can make the court uncomfortable to play on.
Sports-rated luminaires are designed with precise optics, better glare control, and more durable construction. Using the wrong type of fixture often leads to complaints from players and, in some cases, the need for costly retrofits sooner than expected.
Even high-quality luminaires can perform badly if they’re placed or aimed incorrectly. Fixtures mounted too low or positioned directly above key playing zones can create direct glare during serves and overhead shots. Poor aiming can also result in bright hotspots under fixtures and darker zones elsewhere.
Small adjustments in mounting height or tilt angle can make a big difference. Skipping proper aiming during installation is a common mistake that turns an otherwise solid lighting design into a frustrating playing environment.
Reflective surfaces like white walls, polished floors, and especially glass-back panels can amplify glare if lighting isn’t carefully controlled. Designers sometimes underestimate how strongly light will reflect off these surfaces, particularly in glass-back courts.
If reflections aren’t managed, players may experience momentary discomfort during rallies, and spectators behind glass may struggle to watch the game comfortably. Thoughtful beam control and careful fixture orientation help reduce these issues before they become a problem.
Another mistake is designing lighting solely around current needs. A court used mainly for casual play today may host competitions, coaching sessions, or live streaming in the future. If the lighting system lacks flexibility, upgrading later can be expensive and disruptive.
Including features like dimming, zoning, or slightly higher output capacity from the start provides room to grow. Future-ready lighting gives facilities more options without needing a full replacement down the line.
Maintenance is often an afterthought, but it shouldn’t be. Fixtures that are difficult to access or require frequent lamp replacements can quickly become a headache. Courts with high ceilings or limited access need lighting solutions that minimise maintenance visits.
LED systems with long lifespans and reliable drivers reduce downtime and operating costs. Planning for easy access and long-term performance helps keep the court running smoothly year after year.
Finally, one of the biggest mistakes is trying to cut corners by skipping proper lighting design altogether. Relying on generic layouts or guesswork often leads to uneven results that frustrate players and staff alike.
Working with lighting professionals who understand squash-specific requirements helps avoid many of these pitfalls. The upfront effort usually pays off in a court that feels better to play on, costs less to operate, and stays relevant for years to come.
Not all lighting suppliers understand the specific demands of squash. When speaking with potential suppliers, it’s worth checking whether they have direct experience with squash courts or similar indoor sports. General indoor lighting knowledge is helpful, but squash has unique challenges around glare, wall illumination, and vertical ball movement.
A good supplier should be able to explain how they manage glare, how they ensure even lighting on both floors and walls, and whether they provide lighting calculations or simulations before installation. These simulations show expected lux levels and uniformity, helping avoid surprises later. Be cautious if the conversation focuses only on wattage or fixture count. Experienced suppliers tend to talk more about player sightlines, uniformity ratios, and how the court will actually feel during play.