Lighting a natatorium is more than just hanging up some bright fixtures and calling it a day. With reflective water surfaces, humid air, and swimmers’ safety at stake, figuring out the right lighting setup can make a huge difference. When done well, lighting enhances visibility, mood, and safety—but if done poorly, it can lead to glare, uneven spots, and discomfort. The goal isn’t perfection, but to strike a balance: enough brightness, good color, comfortable ambiance, and a thoughtful layout that works with the space.
Lighting Design Principle
Brightness – Lux / Foot-Candles
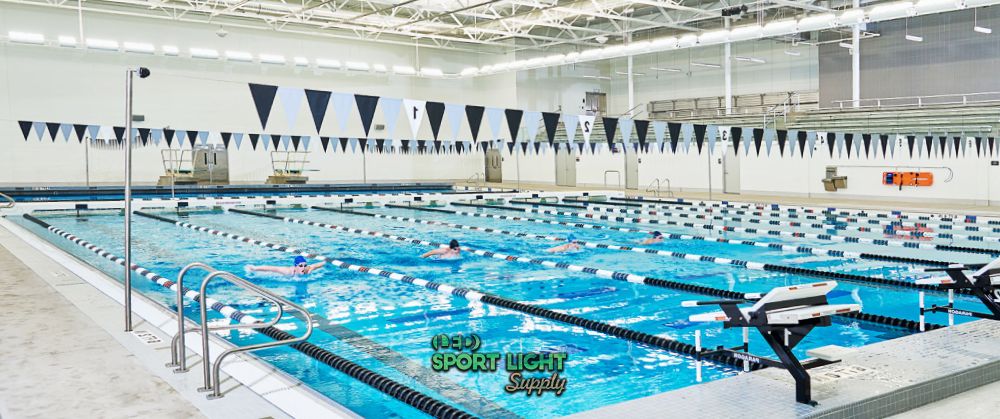
When talking about lighting in a natatorium, brightness is usually the first thing that comes to mind. It’s all about how much light actually reaches the pool surface and surrounding deck. For most competitive swimming pools, the sweet spot tends to be around 300 to 500 lux (that’s roughly 28 to 46 foot-candles) measured right on the water surface. This level gives swimmers enough visibility to see lane lines, walls, and turns clearly—especially during races or training sessions where precision matters.
Recreational or community pools don’t need to be quite as bright, but they still shouldn’t feel dim. Around 200 to 300 lux usually works for those spaces. Think of it as enough light to feel lively and open without blinding anyone. A good rule of thumb is to always check the lighting both above the water and under it. You’d be surprised how a pool that looks bright from the stands can feel a little gloomy when you’re actually swimming in it.
Also, since water is super reflective, brightness doesn’t behave the same way it does in a gym or a basketball court. Light tends to bounce off the surface, so the design needs to consider how it interacts with waves and ripples. The trick is to make the brightness uniform enough that lifeguards can easily see the pool bottom, even when the water’s moving. That’s why balancing light intensity and reflection is so key for visibility and safety.
If you’re aiming for professional or televised swim meets, lighting requirements often get stricter. Some international swimming federations suggest up to 750 lux or more for televised events to ensure cameras capture clear underwater footage and true color. That’s bright enough to feel like daylight inside the pool hall, but still comfortable when paired with the right color temperature and diffusers.
Color Temperature
Next up is color temperature, which affects the overall vibe of the natatorium and how everything looks—especially the water. Color temperature is measured in Kelvin (K), and for most pool environments, you’ll see values hovering between 4000K and 5000K. This range hits a natural “daylight” tone that keeps the space feeling fresh and energetic.
If you go much cooler—say, over 5500K—the light starts to look a little too sterile, almost like a hospital. Warmer tones, below 3500K, might look cozy but they can make the water appear murky or greenish, which isn’t ideal. A clean, balanced white (around 4500K) tends to make both the water and tiles pop, giving that crisp, inviting look swimmers love.
One small but often overlooked detail is color consistency between fixtures. If some lights lean warm and others cool, you’ll end up with patches of different shades that make the water look uneven or even dirty. It’s subtle, but once you notice it, you can’t unsee it. That’s why professional pool lighting systems often specify a color rendering index (CRI) of at least 80 or higher—this ensures that colors (like lane ropes, wall flags, and swimmers’ gear) appear accurate under artificial light.
Uniformity Across the Pool
Uniformity basically means how evenly the light is spread out. You don’t want bright spots over the diving platforms and dark corners near the shallow end. In a natatorium, inconsistent lighting doesn’t just look weird—it can actually be distracting for swimmers and unsafe for lifeguards.
A typical target uniformity ratio is around 1.5:1 to 3:1, meaning the brightest spot shouldn’t be more than three times as bright as the darkest spot on the pool or deck. Once that ratio gets higher, the human eye starts to notice contrast, and glare becomes harder to manage. For lifeguards sitting at different angles, this can make it tricky to detect a swimmer under the surface.
Uniformity also ties in with the type of lighting layout you choose. For example, asymmetric beam fixtures can be aimed to throw light more evenly across the lanes. Some designers even use computer simulations to map out light distribution before installation. The goal is for both swimmers and spectators to experience a consistent brightness, whether they’re at lane one or lane eight.
Managing Glare – Diffusers, Beam Angles, and Reflections
If you’ve ever tried to swim laps under blinding lights that reflect straight off the water, you already know how annoying glare can be. Glare happens when light hits the water or other shiny surfaces (like metal railings or wet decks) and bounces into your eyes. In a natatorium, that glare can be two or three times stronger than in other sports halls because water acts like a mirror.
To reduce it, designers often rely on fixtures equipped with diffusers, anti-glare louvers, or shields that soften the light before it reaches the pool. This helps spread brightness evenly without creating “hot spots.” A diffuser basically scatters light in multiple directions, cutting harsh reflections off the water’s surface.
The beam angle of a fixture also makes a big difference. Narrow beams (below 30 degrees) create strong, focused light—good for accenting certain areas like diving boards, but not great over open water. Wider beams (60 to 120 degrees) spread light out more smoothly, though you’ll lose some intensity. Many modern natatoriums use medium beam angles (around 45–60 degrees) to balance coverage and clarity.
Another trick is adjusting the aiming direction of lights. Tilting them slightly downward (often around 10–15 degrees) reduces the chances of the beam bouncing off the water into swimmers’ or spectators’ eyes. That’s especially helpful in competitive pools where cameras and electronic timing systems can get messed up by reflected glare.
Finally, humidity and condensation can also affect how light travels. Fixtures with IP65 or higher protection ratings are made to withstand that environment, preventing fogged lenses or light scattering caused by moisture buildup. That might sound technical, but it’s a game-changer in keeping visibility sharp throughout the year.
Reflection Control and Ceiling Finish
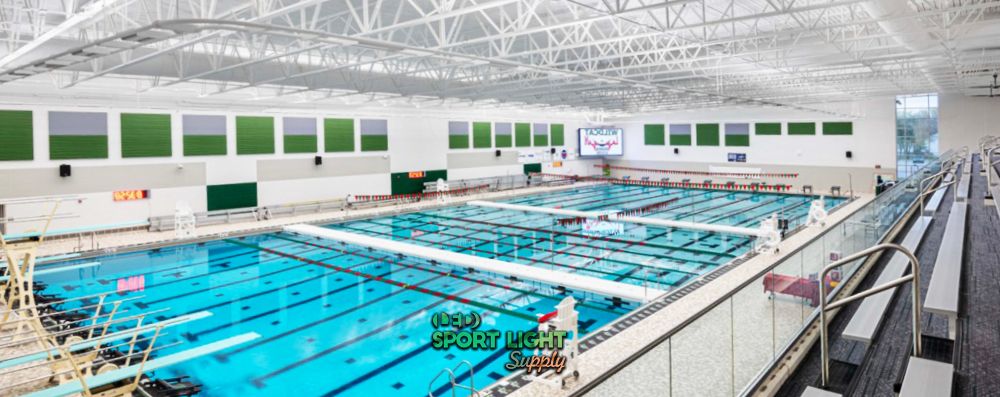
One factor that often gets overlooked in natatorium lighting is how ceiling color and surface finish affect light reflection. Because water already acts like a giant mirror, the ceiling’s reflectivity can either help or hurt overall illumination. A light-colored matte ceiling—something with around 70–80% reflectance—can bounce light softly back into the space without creating harsh reflections. Glossy or dark finishes, on the other hand, tend to produce glare and visual noise, especially when combined with strong overhead lighting.
In modern pool design, some architects use acoustic ceiling panels with reflective coatings that both reduce echo (a big issue in natatoriums) and enhance light distribution. The trick is finding that balance—enough reflection to brighten the upper space but not so much that it adds shimmer or double reflections on the water surface. Thoughtful ceiling materials can easily boost perceived brightness by 10–15% without adding a single extra fixture.
Integration with Daylighting
Natural light can be a blessing and a headache at the same time in indoor pools. When designed right, daylighting through skylights or clerestory windows helps reduce reliance on artificial light during daytime hours. However, without control, it can also cause glare, uneven brightness, or even dangerous reflections off the water.
To make it work, many designers use UV-filtering glass, frosted glazing, or automated blinds to diffuse daylight evenly across the pool. Pairing these with dimmable LED systems lets the artificial lighting automatically adjust based on sunlight levels—keeping illumination consistent throughout the day. With the right balance, daylight integration can lower energy use by up to 20–25% while keeping the natatorium bright and comfortable from morning practice to evening events.
| Lighting Aspect | Recommended / Typical Values |
|---|---|
| Brightness (Competitive Pools) | 300–500 lux (≈28–46 foot-candles) |
| Brightness (Recreational Pools) | 200–300 lux |
| Color Temperature | 4000K–5000K (ideal around 4500K) |
| Uniformity Ratio | 1.5:1 to 3:1 |
| Beam Angle (Typical Range) | 45°–60° |
| Aiming Tilt Angle | 10°–15° from vertical |
Natatorium Lighting Layout Explain
Height
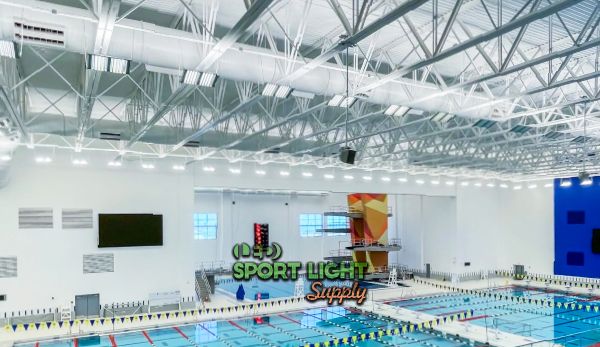
The mounting height of lighting fixtures in a natatorium isn’t just a construction detail—it totally changes how the space feels and functions. Mount them too low, and you’ll get harsh glare reflecting right off the water into swimmers’ and spectators’ eyes. Mount them too high, and the light spreads too wide and loses intensity before it even hits the pool surface. That’s when shadows start showing up in weird places—under diving boards, around structural beams, or in corners where lifeguards really need clear visibility.
Most natatoriums have pretty tall ceilings, often around 8 to 12 meters (25 to 40 feet) high, especially in facilities built for competitions or with diving platforms. At that height, fixtures need to be high-output luminaires, usually LED-based, that can deliver enough brightness—often over 20,000 lumens per fixture—to maintain the recommended lux levels down at the water surface.
When lights are mounted above 10 meters, it’s also smart to consider optical control accessories like reflectors or asymmetric lenses to direct more light downward where it’s needed most. Without that, you’ll waste light energy hitting walls and ceilings instead of the pool itself. Some designers even use tiered lighting setups, where one row of fixtures focuses on the pool and another targets the surrounding deck or spectator seating. This layered approach keeps the illumination balanced across different zones.
One more practical note—maintenance. High ceilings look beautiful but changing or cleaning lights 40 feet up isn’t exactly easy. That’s why using long-life LEDs (with lifespans around 50,000–100,000 hours) or fixtures that can be lowered with winch systems can save a ton of trouble down the line.
Spacing Between Lights
Spacing is where math meets design. How far apart each fixture sits determines whether you’ll end up with a smooth, even glow across the pool—or a patchy, uneven mess. If lights are spaced too far apart, dark pockets show up on the water, making it tough to judge depth or see swimmers clearly. Too close, and you’re wasting energy, increasing costs, and probably getting uncomfortable glare spots.
A common rule of thumb for natatoriums is that the spacing between fixtures should be about 1 to 1.5 times the mounting height. So if your lights hang 30 feet above the water, spacing them roughly 30–45 feet apart usually gives good overlap and even coverage. Of course, that’s not a one-size-fits-all number—beam angle, light distribution pattern, and the reflectivity of the walls and ceiling all come into play.
Modern lighting design software can simulate these factors, showing where shadows might appear before anything gets installed. That’s super helpful in spaces with irregular shapes—like pools with diving wells, spectator stands, or bulkheads that break up the layout. Getting the spacing right ensures both uniformity and comfort, which really matters when swimmers are looking up to breathe or spectators are following a race.

Direct or Indirect Lighting
When it comes to how light actually hits the pool, there are two main styles: direct and indirect lighting.
Direct lighting is pretty much what it sounds like—light shining straight from the fixture to the target. It’s more efficient because there’s less light loss, and it’s what you’ll see in most competition pools. Fixtures are often mounted high and aimed down toward the water at calculated angles. The goal is to maximize brightness and minimize reflection.
But direct light alone can sometimes feel a bit harsh, especially in smaller community pools or leisure centers where people want a more relaxed vibe. That’s where indirect lighting comes in. By bouncing light off reflective surfaces like white-painted ceilings or walls, you can create a softer, more diffused effect. It’s great for spectator areas, locker room corridors, or lounge spaces where visual comfort is just as important as brightness.
The trade-off? Indirect lighting is less efficient—somewhere around 20–30% of light output can be lost through reflection. So, when mixing the two types, designers often keep direct lighting as the backbone and use indirect fixtures to smooth things out visually. The result feels bright but not blinding—a comfortable environment for swimmers, coaches, and viewers alike.
| Lighting Type | Pros | Cons |
|---|---|---|
| Direct Lighting | Higher efficiency and lower power consumption (less light loss)
Provides strong illumination for competitive swimming and large pools Easier to control light direction and maintain targeted brightness |
Can create glare and harsh reflections on water
May cause visual discomfort for swimmers or spectators if not aimed correctly Shadows can appear under diving boards or structural beams |
| Indirect Lighting |
Produces soft, diffused light with reduced glare Enhances visual comfort and ambiance in leisure or spectator areas Can make the space feel more open and inviting |
Less efficient—20–30% of light output lost through reflection
Requires reflective surfaces (light-colored ceilings/walls) for best results Higher installation and fixture costs due to extra components or mounting angles |
Aiming Direction
Even if you’ve nailed brightness, height, and spacing, the aiming direction can make or break the design. Lights shouldn’t just be installed and left as-is; they need to be carefully aimed to hit the right spots while avoiding reflections and glare.
For example, fixtures positioned above swimming lanes should be aimed slightly off-center so the beams don’t reflect directly back into swimmers’ eyes when they breathe or do backstroke. Lights over the deep end can be tilted more vertically to penetrate the water effectively, while those over shallow or deck areas can be angled wider to illuminate pathways and seating zones.
Ideally, fixtures are aimed downward at about a 10–15° tilt from vertical, which helps reduce water-surface reflection and keeps light from bouncing off walls or spectator glass. This angle also prevents glare from blinding officials or audience members during races.
If the natatorium has large windows or skylights, light aiming gets trickier. Artificial lights should be adjusted so they don’t compete with or reflect off incoming natural light. In some cases, adjustable brackets or mounting arms allow fine-tuning even after installation—helpful when you need to adapt the lighting for different times of day or event setups.
And just like before, humidity and reflection control are part of the equation. Aiming can even help reduce ceiling condensation visibility, since uneven light sometimes makes moisture buildup more noticeable. It’s those little details that make the entire pool space look polished and feel comfortable to everyone inside.
Why Getting the Right Lighting Design and Layout Matters
 Getting the lighting right in a natatorium might sound like a technical detail, but it’s actually one of those things that completely changes how the space feels and functions. It’s not just about how bright the pool looks—it’s about how well people can see, move, and perform in it. Swimmers, coaches, lifeguards, and spectators all rely on consistent, comfortable lighting to do their part safely and effectively.
Visual Clarity and Comfort for Everyone
A well-thought-out lighting design helps swimmers feel confident in the water. They can clearly see lane lines, the pool bottom, and turning walls, which matters a lot during fast-paced races or underwater drills. When lighting is off—too dim, uneven, or overly harsh—swimmers start squinting, misjudging distances, or losing track of their orientation under the water. That’s not just inconvenient, it’s stressful and potentially dangerous.
For lifeguards and referees, proper illumination is just as key. Lifeguards need to detect movement below the surface instantly, and uneven lighting or glare can make that harder than it sounds. Even a few seconds of delay can make a big difference in an emergency. Referees, on the other hand, rely on clear visibility to monitor strokes, turns, and finishes during competitive meets.
Spectators benefit too. Nobody enjoys watching a meet under blinding lights or with distracting reflections bouncing off the water. When the lighting is balanced and consistent, people can focus on the competition instead of constantly adjusting their eyes. Over time, bad lighting leads to visual fatigue—swimmers and spectators alike end up tired not from activity, but from eye strain.
Energy Efficiency and Long-Term Savings
Lighting eats up a noticeable share of a natatorium’s total energy use—often 30% to 40% of the overall electricity bill in some facilities. Since pool lights usually run for long stretches every day, optimizing energy efficiency is a big deal. Choosing LED fixtures with high luminous efficacy (something like 120–150 lumens per watt) helps you get more light while using less power.
But efficiency isn’t just about the bulb. The way lights are aimed, spaced, and positioned can make or break performance. Poorly aimed lights waste power by sending light where it’s not needed—like onto ceilings or walls instead of the pool. On the other hand, a layout that directs beams precisely where visibility matters means fewer fixtures, lower wattage, and smaller utility bills without sacrificing brightness.
Modern control systems also help cut costs. For instance, using dimmable LEDs and smart controls allows operators to reduce brightness during off-peak hours or when natural daylight fills the pool hall. Some advanced systems even automatically adjust output based on real-time light readings. These small tweaks can save thousands of dollars over the life of the system.
Maintenance and Durability
 Anyone who’s worked in an indoor pool knows how rough that environment can be on lighting equipment. Constant humidity, high temperatures, and chlorine in the air can corrode fixtures and wiring faster than in normal conditions. That’s why choosing the right materials and IP-rated protection (at least IP65 or above) is so crucial. It keeps the fixtures sealed against moisture, ensuring they perform consistently year-round.
Maintenance becomes a real challenge in spaces with high ceilings (8–12 meters or more). Changing a single fixture can require scaffolding or lift systems, which interrupts schedules and adds labor costs. That’s why many designers now opt for long-life LEDs, lasting up to 100,000 hours, and fixtures designed for easy access or remote lowering systems. Those choices might cost a bit more upfront, but they pay off in fewer replacements, less downtime, and a safer maintenance process.
Aesthetic Appeal and Atmosphere
Lighting doesn’t just affect visibility—it shapes the mood and appearance of the entire natatorium. The way light interacts with water, tiles, and architectural features can make the space feel either inviting and lively or flat and sterile. Well-balanced, neutral white light (around 4500K) brings out the natural blue tones of the pool water while keeping skin tones and surfaces looking natural.
The aesthetic aspect also matters for branding and photography. Many modern aquatic centers host televised or live-streamed events, where lighting directly affects camera performance. Proper brightness and color rendering (a CRI of 80+) ensure that the water looks crisp, the athletes’ uniforms are vivid, and the overall scene looks professional on screen.
On a more personal level, a well-lit natatorium simply feels better to be in. Parents watching lessons, swimmers training for hours, and coaches standing poolside all spend a lot of time in that environment. Comfortable lighting creates a sense of energy and focus without making the space feel harsh or overwhelming.
Safety Above All
At the end of the day, lighting in a natatorium ties back to safety. Clear visibility helps swimmers avoid collisions and lets lifeguards instantly spot someone in trouble. You need enough illumination to see the pool bottom, steps, ladders, and edges at all times—even when the water’s turbulent. It also makes it easier to read emergency signs and locate exits during power outages or drills.
According to some facility guidelines, a well-designed pool should have at least 200 lux of maintained lighting on all walking surfaces and 300 lux on the water surface for safe operation. When those levels drop—due to burned-out lamps, dirty fixtures, or poor layout—the risk of accidents and delayed response increases noticeably.
Good lighting can even improve psychological comfort. People naturally feel more secure in well-lit spaces, which matters for children, beginners, or night-time swimmers. Nobody likes diving into a dim, shadowy pool where you can’t quite see the bottom. Consistent, bright, and glare-free light makes the whole space feel safer and more welcoming.
Bringing It All Together
When putting together a natatorium lighting plan, designers often start by surveying the space: measuring ceiling height, noting reflective surfaces, mapping out spectator vs swim zones, identifying glare sources (windows lights, reflective walls), and considering access for maintenance. Then fixture selection is matched to those findings—choosing beam angles, color temperature, durable fixtures (humidity, chlorine exposure), diffusers or shielding.
Then comes simulation or mock installation: sometimes software helps to model lux levels across the pool floor, check uniformity, spot potential glare. Physical mock‐ups or trial installations let installers adjust aiming and spacing before full deployment.
Careful coordination with other systems helps too: natural light, daylighting, skylights, or windows can be leveraged during the day but may bring glare issues; dimming systems or shading may be needed. Also, considering control systems (timers, dimmers) allows tweaking brightness by time of day or event type (competition vs practice vs recreation), saving energy and increasing comfort.